Flutter: Managing Orientation Through Navigation changes

There are lots of different tools you can use when building a mobile app.  

You can, of course, write a different version of the app for each platform. This gives you the greatest power and ability to leverage each mobile operating system, but at the cost of having to create at least two versions of your app. There are also options to “Write once, run anywhere,” but those also have limitations — you may have to compromise some goals, but you can also move quickly and with a lower cost.

Today, we’re going to talk about one such tool that will enable smooth and easy-peasy cross-platform mobile app development: Flutter.

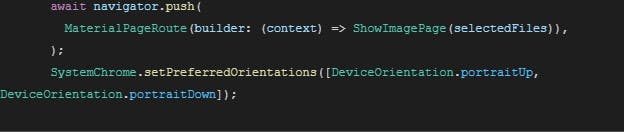
More specifically, how you can manage orientation through navigation changes. 

Setting the Stage

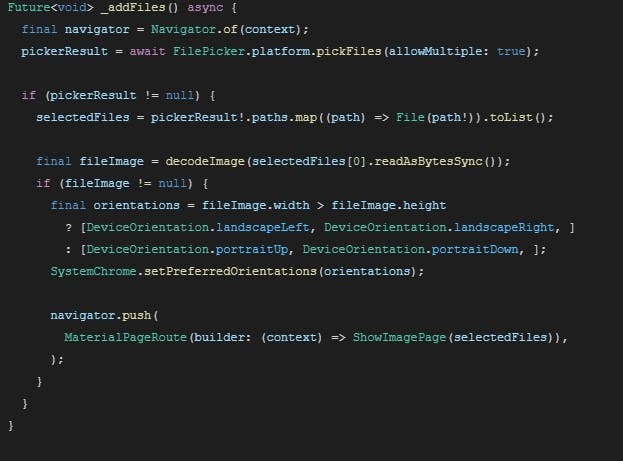
Before we begin, let me set the stage for you: I was writing a little app to quickly switch between two photos/screenshots on my Android phone. The Images app that comes with my Android phone has nice slide transitions, but I needed an instant redraw to detect differences. Not a huge use case, but it took enough time to make an app worthwhile.

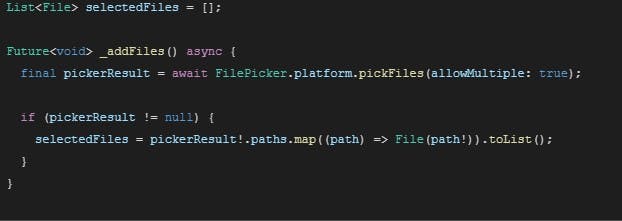
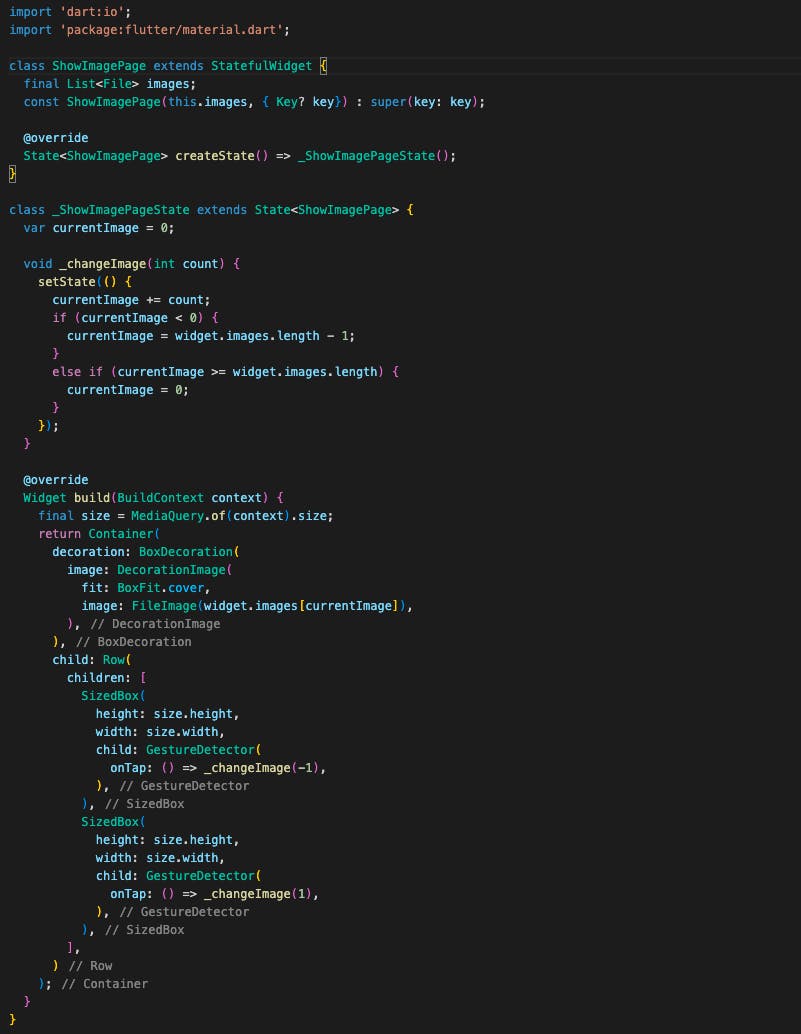
It was (and is) a very simple app — you open a screen that allows you to select any number of images from the device, then go to a second screen that would let you advance between images.

The easiest way to start any Flutter app is with the ```flutter create``` command. Once the app structure has been created, I go in and clean out all the helpful comments so that I can focus on the code.

Flutter in Action

The best way to demonstrate the sheer awesomeness that is Flutter is to work through an example together.

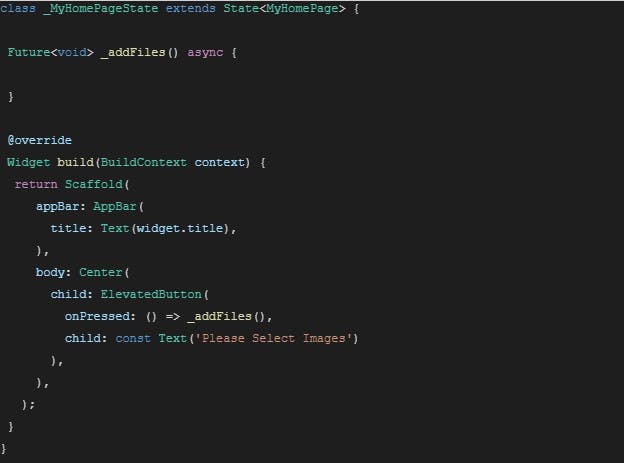
We’ll start by creating our main page by replacing the _MyHomePageState class with something just a tad simpler — a single button in the center of the page, which, for now, will do nothing.

```

```

Running your application should show a screen similar to the following.

Next, we’ll finish that _addFiles function by loading a platform-specific file selection screen. To make that easy, I pulled in a library called file_picker. First, you’ll need to add that to the dependency section in your pubspec.yaml file. You then should be good to use it in your code. This is a pretty straightforward library, and our _addFiles now looks like this:

```

```

Now it’s time to add a new route (page) that will show our images.  

We’ll add another stateful widget since it will have to track which image is currently displayed. We’ll add a couple of GestureDetectors on top of the image to allow taps on the left or right side of the screen to go backward or forward in the selected images. Since we still haven’t made it to the main problem that drove this article, we’ll cut to the chase — here’s that widget:

```

```

Then we just go back to _addFiles and add a ```Navigator.push``` to get us there.

So far, so easy, and hey — it’s all done, right?

Well, as it turns out, some of the sets of images that I want to compare are in Landscape mode, but I tend to keep my phone locked in Portrait mode, so there was an obvious problem: once we get the images, we need to force a screen orientation change to match — we can’t count on the user (me) unlocking the orientation and then turning the phone to fit the image.

In Flutter, that’s done with a function called ```setPreferredOrientations``` from the services library that comes with Flutter. The only tricky part is that in order to know which orientation we need, we have to first load the file. So, we’ll first add that back in our _addFiles function, and we’ll use another third-party library called “image” for its handy ```decodeImage``` function that uses the bytes from the file directly.

```

```

Now it’s perfect, right?

Again, not quite. This sets Landscape mode properly for the images, but it leaves the app in that orientation when you come back. There’s a reason I lock my screen orientation and want it to always reset.

That requires a very minor change since we just need to know when we come back from the ShowImagePage. There are a couple of ways to achieve this. On a more complex app, we might want to use a RouteObserver. With this method, we would not have to worry about how many or what kind of navigation changes we went through before getting back to our file selection page. For a two-page app, however, the easiest way is to simply await the result of the Navigator.push, and reset the orientation upon return.

```

```

Room for Improvement

And, at last, my simple little project behaves the way I want it to. Now, while it works great for me and the way I use my phone, there is a lot of room to improve this. For example, when the app is starting, save the current orientation using MediaQuery:

```

```

And then map that back to the DeviceOrientation enum used by ```setPreferredOrientation```. My use case was one where I was trying to visually compare similar images, so handling images with different orientations didn’t make sense, but you could certainly handle that case as well.

For your convenience, I’ve included the complete source code here.

Final Notes

Flutter gives you excellent control over most aspects of mobile app development (yes, there are a few glaring holes at present <cough>camera<cough>), but for most apps, it is a very quick way to achieve multi-platform support, while providing identical experiences in all platforms and excellent performance.  

I hope you enjoy your current language and you’re always striving to learn new ones!